Thursday has become my favorite day of the week!! Why you ask? Why, the Saw It. Pinned It. Did It. Link up of course! Any excuse for me to get my craft on and finally do some projects around the house is a plus in my book. Besides I love browsing what everyone else is doing to keep me motivated. So what are you waiting for link up already!
My inspiration for this week:

Source: ironicallyanastasia.tumblr.com via Kerry on Pinterest
I have just been in love with Anchors lately. I love the ocean and living in the North East all my life being within 20-30 minutes of the ocean might have something to do with it. However I also love the symbolism of the anchor to, holding your ground, unshakable, staying strong. But enough about me…..

Supplies Needed:
Two Contrasting Colors – I used left over paint from my 1/2 bath (Olympic Premium Interior Satin in Butterfly Bush) and my guest bedroom (Valspar Ultra Premium Interior Satin in Nimbus Cloud) both from Lowe’s.
Monogram Letter (Wood or Finished is fine – From A.C. Moore) ~ Small Wood Anchor or other design (A.C. Moore) ~ Paint Brushes or Foam Brush ~ Painters tape ~ Glue Gun
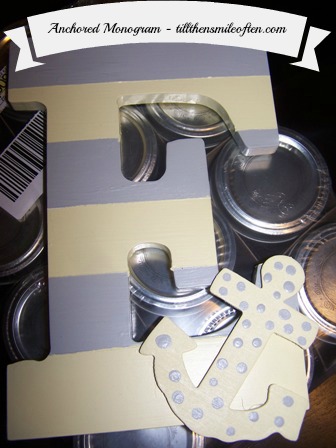
1. Measure your letter’s length to determine how wide you want your stripes to be. I chose 2.5″ for each color section.
2. Tape off one section of color. If you look closely I marked in pencil G for Gray and Y for yellow so I could remember the color to paint.

3. Paint your first color in the open sections. I chose to paint the sides as well, but I’ll leave that up to you. I let the paint dry for about 30 minutes then did a second coat. Let that dry for about an hour and then pull the tape off.
4. Make sure the above sections are completely dry before taping off for the second color. Don’t want to pull off the tape to have it rip off with the tape.
5. Paint the second color waiting 30 minutes in between coats and pull the tape off after about an hour.
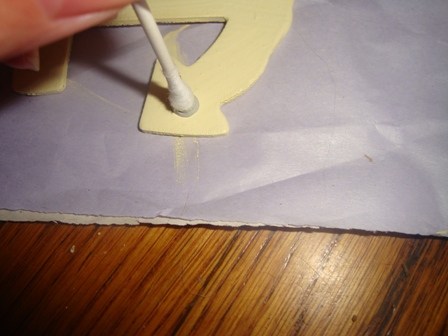
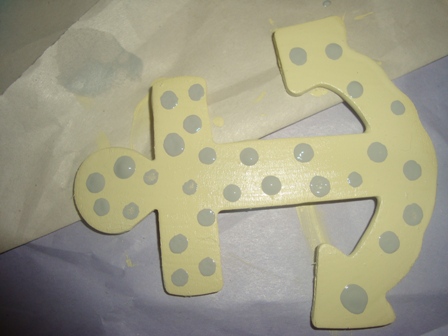
6. Paint your anchor with the base color of your choice. I did this in between drying coats to save time. Let dry about 30 minutes and using a Q-tip make the dots in random order. Then let dry.
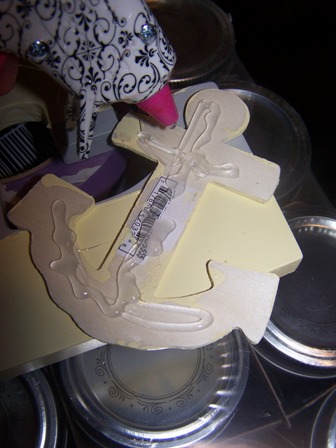
7. Once all sections are dry, use your glue gun to secure the anchor to the letter.
8. Hang on the wall and enjoy!! My letter had a hole for a screw so no additional hardware was needed. You may need this if you use the plain wood letters.
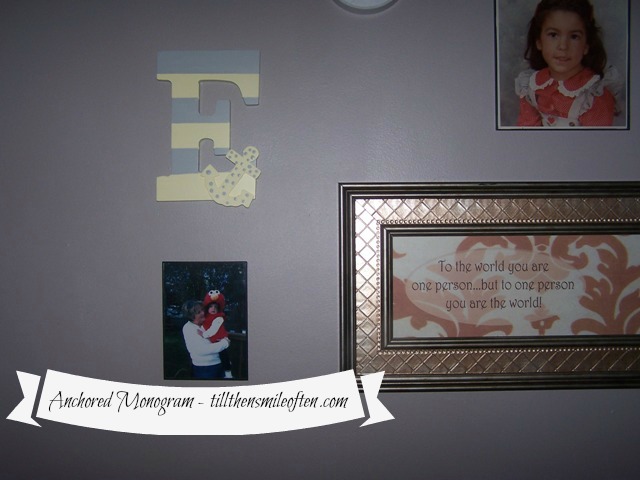
(yes that is my baby picture, no I don’t know what my Mom was thinking with that outfit)
I am so in love with this project. My two favorite colors and the anchor what more could I want. Since it is in my hallway outside by bedroom I see it everyday, which makes me smile!
Don’t forget to check out the two co-hosts of this linking party, Steph and Katie. Join the linkup with your Pinterest projects and take a look at all the other projects completed!


[…] Anchored Monogram […]